
Introduction
This guide explains how to upload voicemail audio files to your voicemail mailbox. You will learn the steps to access the voicemail upload interface, select the appropriate mailbox, and manage different greeting types. There are also some important caveats regarding temporary greetings and potential interactions with custom IVR setups.
This article assumes you have already uploaded audio files to the account portal, For details on how to do this please follow the Uploading Audio Prompts steps laid out in: Audio Prompt Management
Steps to Uploading Voicemail Audio Files to Your Voicemail Mailbox
Access the Audio Upload Section
- Navigate to the “Audio” Section: Log in to your account portal. From the top navigation bar, click on the Audio tab. This will take you to the “Audio Slots” section, now click on the “Audio Files” section where you can view and manage audio files.
(Refer to the image below for visual reference.) - Open the Upload window: In the “Audio Files” section, click on the Mail button inline with the audio file you would like to upload and it will open the “Upload Prompt to Voicemail” screen. This screen allows you to upload an audio file as a voicemail greeting. The screen will contain fields for selecting a mailbox and greeting types.

Upload a Voicemail Audio File
- Select Mailbox or Subscription: Choose the target mailbox from the dropdown labeled Mailbox/Subscription. This is the voicemail box where the greeting will be applied.
- Select Greeting Type(s): Under the “Select Greeting Type(s)” section, choose which greeting type you wish to use the recording for:
- Unavailable: This greeting will be played when you are unavailable.
- Busy: This greeting will be played when your line is busy.
- Temporary: Temporary greetings are special greetings that will play in place of any other recording.
Note: Temporary greetings can only be removed by calling the voicemail platform via your phone via one of our access numbers.
See below details connecting to the voicemail platform and section 3.3.3.4.1 of the Simtex Voicemail User Guide for details on removing temporary greetings.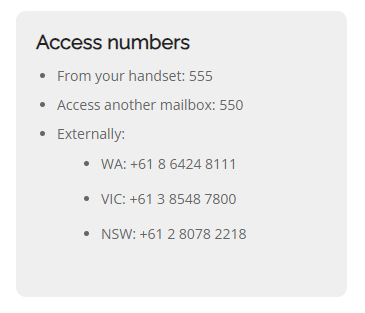
- Upload the File: Once all the fields have been selected, click Upload to confirm. The uploaded greeting will replace any existing greeting on the selected mailbox
-
Important Caveats:
- One-Way Replacement: Uploading a new voicemail greeting will overwrite any existing greetings currently in place for the selected mailbox.
- Interaction with IVRs: If your account has a IVR/AA in place, playback of voicemail greetings may be defined through the IVR using Audio Slots before forwarding to the mailbox. Be sure to check support about your IVR setup to check which method has been set up for you and if any changes are required.
FAQs
-
What happens if I upload a greeting to a mailbox that already has a greeting?
The new greeting will overwrite the existing one. -
How can I remove a temporary greeting?
You can remove a temporary greeting by calling555 or 550and following the prompts. Refer to the Voicemail User Guide for more detailed instructions. -
Can I have different greetings for different situations (e.g., unavailable vs. busy)?
Yes, you can specify different greetings for different scenarios using the greeting type checkboxes (Unavailable, Busy, Temporary).